Showing posts with label nail art. Show all posts

Tuesday, November 12, 2013

Broken Glass Manicure

Hi guys! So today I have for you something that I've wanted to do for a very long time, ever since I saw a picture of it on Pintrest. 

It's a broken glass manicure:


I started out with a coat of Julep Nail Therapy (bought it in the secret store as part of the Nail 911 kit). Then over that I put a coat of ORLY Bonder. 

Next for every nail I used Color Club Beyond, a black holo. Color club holos are the best, I don't own any others because I don't need them with this collection. This is how it started out: 


I think it's cool to have the holo peeking out in the background. I tried to capture the effect with flash, because I do my nails at night and the sun has gone MIA around here lately. 


The polish I used for stamping is No Placd Like Chrome by Essie, which actually worked pretty well. 

When I got my new Mash plates I was really excited to see that there are, not one, but two broken glass images. I have no idea why, because they look exactly the same to me. I used both of them just to make my life easier. They're on image plates 57 and 72 from the newest collection. 


You're probably wondering what that hot mess is on my ring finger. That's Crystal by Julep. It's a diamond reflective top coat, and it's just diamond shapes in a clear base. Some if the diamonds don't show up on camera for some reason. I thought this was going to look a lot better than it actually does. Not sure what I could have done to make it look better. It's really thick on my nail so I'm not expecting it to last too long. 


I topped it off with HG Girl Glisten and Glow. I've literally heard nothing but good things about this top coat, and I have yet to find my go-to. Now, you'd think that I would buy a little bottle to try it out, considering that I've never used it before and that I don't know if I'll like it. But no. This is what I bought. 


The biggest, bling-yest bottle I could find. This is on the website for $35.95, and altogether it was about $42 or something with shipping. Really? I paid $42 for a top coat? The funny thing is, I have the Out the Door top coat in the exact same size, and I paid $5.49. 


I mean, the HK girl is supposed to be better, so I'm hoping it helps my mani live for at least a few days. It's thicker than most top coats I've used, but I like that. I'll see how I feel about it in my next couple of mani. 


As always, thanks for reading!

xoxo, 
Belle


Wednesday, November 6, 2013

Thor 2 Nail Art...Loki Nails!

Okay guys.

So, Thor 2 comes out tomorrow, and I am SO EXCITED! Loki is, without a doubt, my favorite fictional character EVER. I don't know if it's because he is played by the amazing Tom Hiddleston, or because his character is so badass, but I love him. I mayyy or may not have been planning this manicure for months. I'm probably going to see the actual movie on Sunday (my day off), but I could see it before. My boyfriend offered to take me to the midnight showing, but honestly I'm getting to an age where I don't even want to go see a movie at midnight.

I'm working every day until Sunday, so there's a huge risk of my nails chipping before I can actually see the movie, but I had some free time and I figured I could always touch it up. 


As always, I used one coat of ORLY Bonder on all nails. Then I did three thin coats of Fight Like a Girl by PISTOL polish. Lastly I used two thin coats of Ciate Mattnificent Matte Top Coat (it came with a Chalkboard Nails Kit that I got as a gift). I used two coats because there was still some streaky shine after one. The accent nail is Oscar by Julep - three coats. I debated using a gold undie, but the glitter is so dense that by three coats it completely covers the nail. I topped it with my HK Girl Top Coat by Glisten & Glow, that I just got today, but I'll talk about that more in a different post (you can't really tell how shiny the top coat makes it because glitter is shiny anyway).

On a totally unrelated note, I noticed that for some reason on a lot of the pictures I was writing belleandarielle@blogspot.com instead of belleandarielle.blogspot.com. I don't know where the @ came from....maybe I like the way it looks? Who knows.

Also...I broke my no-buy today....but it's for a really cool reason! And I will definitely be showing you guys when I get them :)

That's all for now.

xoxo,
Belle


Thursday, October 31, 2013

Halloween Costume Nail Art

Hi guys! So you would think that the manicure I actually wear on Halloween would be Halloween-themed, but I decided to match it with my costume. I'm going as a female gangster. 

Here it is: 


The base color is Space Cadet by Glitter Guilty, made specifically for me for my first Glitter Guilty Pleasures Box. 

When I first got this color I wasn't thrilled with it. It's pink crelly base with holographic orange microglitter, magenta and white circle glitters, and white bar glitters. This was my first indie polish ever, and the glitter was all in the middle of the bottle, so didn't really get any out on my first try. This time, I had the bottle upside down on my rack for the past week, and I thought that the polish was really pretty when you put it all together. It works as a great girly or "Barbie" color. 

Dollar signs were made with Mash Image Plate M32, and the diamond were from Bundle Monster BM09. I stamped with green and black Konad stamping polish. Since I wanted to green to show up on the pink, I stamped each dollar sign twice. 

Just have to hope that I can get through 5 hours of work without peeling/cracking/chipping! 

Happy Halloween, enjoy and stay safe! 

EDIT:
Here's a picture of the full costume :) 


xoxo,
Belle

Saturday, October 26, 2013

Wedding Nail Art and Ellagee Haul: Stained Glass


Hey guys! I went to a wedding last night and I did some nail art to celebrate the occasion:


It was a gay wedding, not that that matters, but in case you were wondering about the rainbow. 

My Stained glass nail polishes from Ellagee came the night before the wedding, along with my stamping polishes from Born Pretty Store. It was fate. Although, I don't know if ill be buying from BPS again any time soon. It's free international shipping, and you get things really cheap, but they took FOREVER to come. I did email them, and they said that a lot of packages were held up in Hong Kong and to wait 10 more days. They came on like the 11th day. Also, as soon as I opened the package I smelled nail polish, and I saw that two of the polishes had leaked in the package. I wasn't too happy :(. 

Anyway...
If you didn't know, Ellagee recently released a collection called Stained Glass, which is meant for layering glitter, nail art, decals, and stamping. Basically, you do your base coat, one coat of polish, one layer of stamping, another layer of polish and another layer of stamping. I believe that the polishes are made with top coat, so you don't actually need to use a top coat in the end, but I used one just to protect my nail art. I think that this is a really cool and unique idea, I haven't seen anyone else do this and I knew immediately that I had to have them. Here is what I ordered: 

From left to right: Ruby Glass, Obsidian Glass, Selenium Glass, and Sulphur glass. 

I ordered minis because, let's face it, I will never use up an entire bottle of polish in my lifetime. I also got them on sale with a coupon code. 

Laura usually ships orders really fast, but she had received misspelled labels, and had to wait for new ones to come in. Since her customers had to wait a little longer to receive their orders, she threw in an extra gift. Here is what I got:


It's called Rainbow Syrup, and, unless I'm mistaken, it's a holographic top coat. This is really cool because I dont have one of these, and the only holos I own are the Color Club Halo Hues (although you don't really need any other ones if you own these). I think it's cool because now any color that I have can be holographic, and I don't have to spend money on more bottles of nail polish that I probably won't even use that often. 

Back to the manicure:

I started, as always, with my Orly Bonder as a base. Then I did one layer of Obsidian glass. 

The first layer of stamping: (All done with Mash Image Plates and Konad Stamper and Scraper, and Konad brand white stamping polish from Born Pretty Store). 

Thumb: M54 plate: it's the word Love written in script over and over, you can't really tell in the picture
Pointer finger: also M54: just a bunch of hearts
Middle finger: M13...I call them barbed wire hearts...they're slanty lines with hearts randomly placed. I LOVE this image, and I was really happy to see it because it's on the Bundle Monster plates (which do not work for me, which you already know if you've read any of my previous posts about stamping). 
Pinky: M38: different layers of hearts faceing different ways, I love this one too :)

Then I did another layer of stained glass, and another layer of stamping. Second layer:
Thumb: M54 the LO VE 
Pointer finger: Winged Heart (Ill double check on the plate for this, I forgot to write it down and I'm not at home right now) 
Middle finger: M28: one solid heart with two hollow hearts on either side
Pinky: M17: three hearts going in a curvy line

I covered it with a layer of China Glaze No Chip Top Coat. 

For the accent nail I attempted to do a rainbow ombré with the sponge technique. I used base coat and a layer of white polish from Julep (once again, I'll double check on the name) 
I put all 7 colors on a makeup sponge (various Juleps, China Glazes, and nail art brushes). 

Here's the thing...I'm REALLY bad at sponging. Every time I try to sponge, the polish comes off. I usually just roll the sponge onto the nail two or three times. I had to touch it up a little because some colors didn't show up as much. I just went over it with whatever colors needed touching up and then put a layer of Seche to smooth it out and make it shiney (I'm still waiting on my HK Girl top coat, which I ordered a few weeks ago and hasn't even processed :(). 

As you can see, this didn't come out nearly as good as I wanted it to. The stamps aren't lined up perfectly in the middle, the clean-up isn't completely done, the ombré is a hot mess, etc. I'm lazy and imperfect. This isn't going to be one of those nail polish blogs where the images are perfectly manicured/edited/cleaned up. I'm not a nail technician. I'm learning, and I want to share the creative process with you, both when it looks really good and when it doesn't look so good so you can learn from my mistakes. 

Back to the manicure....
I really like the stamping polishes and the whole layering idea. Something I'm not loving, however, is the fact that it started chipping the next day, BEFORE I even got to the wedding! Granted, in the car on the way I was trying to open a box (of nail polish, ironically). I don't know if it was because of all the layers or because you aren't supposed to use top coat and I did. It makes a really cool effect, it just didn't last that long for me. I'll try without a top coat next time. I'm changing my nails tonight anyway ( going to a Halloween party tomorrow) so it's not really a big deal. 

Buy your stained glass at ellagee.com!

Finally, welcome to our new readers/followers! We appreciate all of your comments and the fact that you read or follow our blog. There might be a giveaway in the works once we reach a certain number of followers, so stay tuned for that! 

xoxo,
Belle


Thursday, October 10, 2013

Some Halloween Nail Art

Hi guys! Just a quick Halloween Nail Art mani that I did:


Pinky is 2 coats of She's a pirate by Glitter Guilty. Ring finger is 2 coats of Bump in the Night by China Glaze [textured] with a spider web stamp from Bundle Monster plate BM13. I used White by Kleancolor to stamp with. 

Middle finger is 2 coats of You're a Hoot by China Glaze...which is one of those fuzzy coats. 

Pointer finger is two coats of Toe-Tally Textured by China glaze. Over that I used a nail brush with black acrylic paint to freehand (in case you couldnt tell) the face. 

Thumb is two coats of Brit by Julep, which is described as a "matte suede finish." On the tip of my thumb I put on some Helen Gurley Brown by PISTOL polish. Then I used an Emori nail art brush in green to do the grass, and a really pointed and thin nail art brush with black acrylic paint to write the letters. 

I'm not really LOVING the way this came out...i feel like I should have used black skull glitters or used Jack Skellington by Sick Lacquers because it has a milky orange base and matches more with what I did. I'm also not loving the fact that I can't use a top coat because it kills the textured effect. I was at work for ONE day and every nail has tip wear/chips except the ones with the Glitter Guilty polish on them. Oh well, I'll probably touch them up for now and do a new mani on my next day off (Monday, or Sunday night.) I'm thinking blood spatter/zombies/glow in the dark (:

Until next time,
Belle

Friday, October 4, 2013

Subscription Review: Nail Art Society September 2013


Hi guys! So today I have for you a review of my second monthly Nail Art Society box, this time for the month of September.

If you didn't already know, Nail Art Society has a subscription service where you get a curated kit of nail art supplies delivered to your door every month. When I joined, the price was like $9.95 plus shipping, so it ends up coming out to like $14.90. I think they raised the price slightly within the last month, so now it's $11.95 plus shipping, but if you're grandfathered in, you still pay the original price.

I knew my box was supposed to come today, but I didn't recognize if right away. Last time it was in a dark purple bubble bag (like Ipsy). However, this one came in a normal, nondescript brown box. I opened the box and found this: 
A mysterious (although reusable) black bag! All these goodies were inside of it: 


Featured product: Gold and Silver Flake:
I've never worked with any kind of flakes before. They seem really interesting, and when I opened the little bottles I noticed they are REALLY delicate! NAS has been posting pictures of manicures featuring the goldflake, so I actually have some ideas of what I can do with it. This is cool  because   I don't own anything like these
in my collection! I'm excited to try them out. 


Nail polish! Yay! This is from the brand Jessica Cosmetics. The color is called Cinnamon Kiss. This color IS fall. It's a gorgeous "blackened" red with metallic shimmer. It's just sexy. 


More Cala Nail Decals! I was happy with the ones I got in the previous box (not so much with the butterfly theme, but with the fact that they are very easy to use and look beautiful). This one includes crowns, lions, crosses, very England royalty. I love crowns so I was excited to see these.


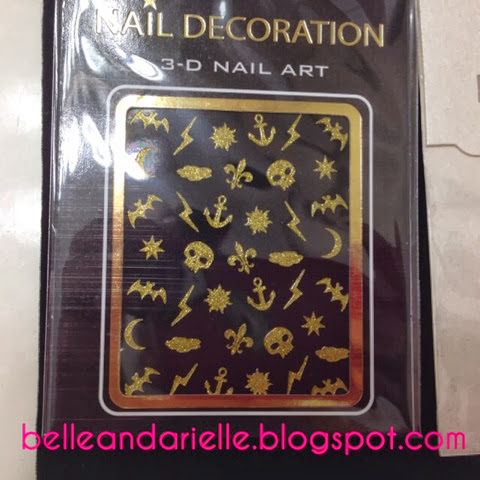
More decals! And they're Halloween themed! There are skulls, moons, lightning bolts, bats, and anchors (which I love, even though they have nothing to do with Halloween). There is so much more variety this time than in the last kit, and I wonder if NAS took customer feedback into consideration while putting this kit together. 


Adoro brand clear teardrop rhinestones: Never heard of this brand before. There are 6 of these rhinestones, they're very sparkly and probably look awesome in the sun. They're kind of big for natural nails, but they look pretty interesting. 


Adoro Elements circle rhinestones: almost all of these are gold, except two that are a really pretty iridescent color that looks different from every angle. They match the whole golden royal theme of the box. 


Finally, two information cards, one about the Jessica Cosmetics nail polish and their Night at the Opera Collection, and one about the featured nail art guru who curated this month's kit, as well as pictures of manicures using the items. 

All in all I think this month's kit is a big success. I really like the Halloween/royalty theme, and the silver and gold flake seem pretty interesting. I'm also glad the kit included nail polish. I have A LOT of nail art items, so it's nice to have things that I didn't previously. Can't wait to see what NAS comes up with next! 

You have until the 15th to sign up to get your October kit, so get yours at http://www.nailartsociety.com

xoxo,
Belle


Tuesday, October 1, 2013

Quick glitter gradient!

Lately I have had horrible allergies.  Nail polish has kinda aggravated it further, so I put polish on the back burner. But today I totally felt a bit better, definitely enough to put polish on.  So I did a simple glitter gradient that dries fast and doesn't look bad if I mess it up.
I always use Seche Clear as a base coat.
I started off with China Glaze Inner Beauty as a base coat to even my nail tone. Only one coat.
Then I used China Glaze Snow Globe, and brought that further up 3/4th's of my nail.
Followed by China Glaze Shooting Stars on 1/2 of my nail.
Finally China Glaze Nova and fanned just the tip of my nail.
Finished with Seche Vite top coat and we are done!!!

Monday, September 30, 2013

Random Nail Art


Hello,

So I saw my mom today and she let me give her a manicure. I wanted to share it really quick:


The main color is Madison by Julep, and the accent color is Oscar by Julep. These are the two colors that come in the intro Bombshell box, and they look stunning together. 

The pointer finger is just a cross made out of rhinestones, and the middle finger is one of the butterfly decals from my September Nail Art Society box. The pinky is a fimo bow. I put Northern Lights Top Coat by Out the Door to give it a little extra sparkle. 

Will probably be posting lots of Halloween related nail art in the near future. 

Peace,
Belle

Friday, September 20, 2013

Fall leaves mani

Hi guys! Quick post with a fall mani I just did. 


Here's how:
1. One coat of ORLY Bonder
2. 2 thin coats of Tatiana by Julep
3. 1-2 coats of Bobbin' for Apples by Hit Polish
4. One coat of Gelous Advanced Nail Gel Coat
5. One coat of China Glaze No-Chip Top Coat. 

For accent nail: 
2. 2 thin coats of A-Taupe The Space Needle by OPI
3. 1 coat of Tough Coat by Winning Nails...I actually put drops in the spots I was going to put to leaves in rather than doing a flat coat
4. Placed fimo leaves with Mash nail art tweezers one at a time and held each one down for 30 seconds 
5. Another layer of Tough Coat over the whole nail 
6. One coat of Gelous
7. Top coat. 

Happy fall
<3

Belle


Saturday, September 7, 2013

Nautical Nonsense

Hi! Just wanted to post a quick summer-is-basically-over mani: 


The base color is Julep's Dianna, that I got in the Big Picnic Mystery Box. It's a really pretty mint green, and it goes on so nicely. I love Julep polish because they're some of the only ones I've tried that don't leave bubbles on my nails. 

The thumb is a freehand attempt to draw a...boat steering wheel? (It probably has a different name). I used a nail striping brush. I did it in gold first, but it came out terribly, so I did silver over it. The effect wound up looking pretty cool by accident. Also used a striper for the pointer finger. I've seen stripe designs like this on Pintrest, and I love how it came out. 

Middle finger is from one of the Mash image plates #32. I used China Glaze Elephant Walk to stamp with. The circle around the compass is supposed to be really thin, but it kept not coming out, so I  just went over it with a striper brush. 

For the ring finger I looked up pictures of anchors and copied it. Before each rhinestone I put a coat of Tough Coat (clear nail art polish), and I used Mash nail art tweezers. 

The pinky is white nail tape. 

This is probably the second favourite manicure I've done (next to the Egyptian one). 

In other news, be prepared for a bunch of subscription reviews and multi-chrome polish swatches (I bought like 10 multichrome polishes and subscribed to a few more nail polish boxes [my bank account is crying]). That's all for now!

xoxo,
Belle


Sunday, September 1, 2013

Labor Day Nails!

Hey guys! Today I just have a quick post of a couple of patriotic manis for Labor Day. I used these for the 4th of July, but you can pretty much use them any time you're feeling patriotic. Onward!


For the thumb I used Mash image plate # 49, pointer finger is dark blue rhinestones, middle finger is star-shaped rhinestones, ring finger is blue and red nail tape over while nail polish, and the pinky is an acrylic bow. I don't own nail glue, instead I used Tough Coat by Winning Nails (got it at Sallys). It just looks like a clear top coat and its for bonding and sealing nail art. Believe it or not, the bows actually stayed on for about a week (one of them I had to remove manually). 


With this one I used the sponge technique, the same that people use to do ombré effects. You start with a base coat, then paint the nails the lightest of the three colors (in this case, it was white). Make a line of each color polish, right on top of each other, and then sponge it onto your nail. I would look on YouTube for sponging techniques if it is your first time (Laynie Fingers has a good one). I did not, and it took me like 2 hours, because I did it wrong (I rolled it on my nail, like you do with a nail stamper) and you're actually supposed to sort of tap it on. 

On top I used Kleancolor in Silver Star, which is a clear base with holographic stars, which I had to kind of pick out with the brush. I topped THAT with China Glaze Fairy Dust, and put a top coat over that. Because I had so many layers, the nails peeled off within a couple of days. I would probably go with 3D star decals
or something like that next time. Even though this mani didn't last that long, it got like 50 re-pins on Pintrest (which is a lot for me). 

Hope everyone has a relaxing and safe holiday (I know I'll be spending mine at work :-/)

xoxo
Belle

Subscription review: Julep Maven September box!

Yesterday, I was lucky enough to get my Julep September box. I was ecstatic. Unfortunately, I had to wait until today to open up my Box-O-Goods. I purchased the 'It Girl' box this month and I can't help myself to a few extras every time. After all was said and done I have six new polishes. So exciting!!!

One reason why Julep is my favorite of all subscription boxes that I have found is the array of colors you can get. In a store I might overlook these colors, but the smaller sizes, coupled with an amazing consistency for each leaves me always wishing I had more.(It gets me to try new colors I wouldn't think of before.)

Short and sweet descriptions of each, with swatches to follow further down.

I named the polishes on the bottles, for your convenience, but in reality, the polishes look a bit darker.  
1. Padma is a purple with the tiniest matching purple sparkles. It comes out really dark on my nails, but I bet in the sun this will look divine. (In the jersey area it's rather cloudy for the past few days.)
2. Karmen  is a wonderful cherry red with tiny golden/orangy sparkles in it.  In the bottle it looks dark, but comes out very vibrant. The affect of the sparkles mixed with the color reminds me of flames for an odd yet inspiring reason.
3. Tatiana  is a wonderful glitter copper color, and glides on so smooth, it's like butter.
 

 4. Catrina is an amazing canary yellow color. Simple, classy and eye popping. I never had a yellow before in my collection. I worry about t clashing with skin tone and possibly being too bright and after trying this color on, It left me wondering what have I been waiting for?
5. Candace is a glitter based polish in the brass/bronze family. This was not an add on, but it was the defining color that helped me choose my box this month. I love it more in person. I can't wait to do something special with this color.
6. Josephine is a blue/gray color. The creamy consistency glides on smooth and it looks perfect. Spot on to the color in the bottle. 


Another fun thing about Julep polish, it comes with this cute sticker on the top of most bottles, so you can swatch the color.  I am not sure why but I love this little extra.
I painted each nail a different color not only to test them all, but to limit the amount of polish that I would have to take off/ Waste. (Since these polishes are only 8ml, you can run though a bottle fairly quickly.)
I picked the purple to do a full manicure with and pictures will come. In all i love every color, and can't wait to try them all out fully. What do you think about these colors? 


Update- here are my nails painted up with Padma. 
I used  Out the 
Door  Northern 
Lights as a top coat just for my ring finger. Just to not have a strictly one color mani.

Wednesday, August 28, 2013

National nails (patriotic nails)

Simple post about my patriotic nails.
I wanted to do a simple design for labor day. and lookef through my stamping plates. simple stars on the blue nails, and it was suposed to be a flag on our middle finger, but it didn't work out.

Tuesday, August 27, 2013

Walk like an Egyptian

Hi guys!

So this is probably my absolute FAVORITE manicure that I've ever done: 


Here's how I did it:

1. Base coat... I used Sally Hansen Powerful Acrylic gel, but you can use pretty much any base coat. 

2. 3 coats of Cowardly Lyin' by China Glaze. For some reason, it just wouldn't get to the level of opacity I wanted. I used thin coats though. 

3. Wait 10-30 minutes before stamping. For real. Or you'll regret it. 

Thumb: Mash image plate #35. 

Pointer finger: If you can't tell, I free-handed this with a nail art brush and acrylic paint. I SUCK at free hand painting (unlike Arielle, who is a naturally gifted artist) so it's not that great. You can get acrylic paint at any arts and crafts store or on amazon...they usually come in bundles of different colors and people use them a lot for nail art. They're also cheaper than nail polish. 

Middle finger: Mash image plate #36. I could not believe that they had an Eye of Horus image...which was probably what inspired the entire mani. I put a dark blue rhinestone right where the pupil of the eye would be. 

Ring finger: Bundle Monster plate #04. I had a REALLY difficult time with this image. All of my MASH images came out in one shot...this one took quite a while and I had to touch it up with a nail art brush. I used light blue nail tape on the top and the bottom of the cat. You can get like 30 rolls of nail tape in different colors for very cheap on amazon. 

 Pinky: Mash image plate #50

Finished it off with Seche Vite top coat. If you can't already tell, I like to do manicures where each nail is different, and I like to combine stamping, rhinestones, nail tape, and basically anything else I have lying around. Anyway, that's all for now, happy polishing!

xoxo,
Belle

Monday, August 26, 2013

Welcome and First Post

Hi guys! Welcome to Belle and Arielle* Nail Art Blog. Arielle and I are two best friends who have a serious passion for/addiction to nail art. We will be sharing our own manicures, reviewing products, etc. We are doing this out of our love for nail art, and nothing more. We hope that we can help to inspire others, as well as help to feed their nail art addiction. Being a nail art addict doesn't hurt anyone/thing, except maybe your wallet.

So I'm just going to jump in with my first post. This is my manicure that I have on right now:

I was inspired by the fact that it is almost fall, and I couldn't be more excited for my favorite season (please excuse the lack of clean-up on the accent nail). I wanted to do an accent nail, but I didn't want to do black, because it's not THAT close to halloween yet, and I also didn't want to do just plain white, so this is what I came up with.

And here is the arsenal of things I used to achieve this look:


From left to right:

1. Start with one coat of ORLY Bonder. Many beauty bloggers recommend this, and for good reason. It really helps the nail polish to stick to the nail to help prevent chipping/peeling. A few downsides of this product are that it does not protect against nail staining and/or breakage. However, for me it does what it's supposed to do, which is why it is an essential piece of my mani arsenal.

2. Apply one coat of Gelous Advanced Nail Gel Coat. This is pretty thick because it is supposed to make your nails like a gel, without having to expose them to UV light.

3. Apply two (thin) coats of Clubbin til Sunrise by OPI

4. Apply another coat of Gelous

5. Apply one coat of Northern Lights Top Coat by Out the Door. This was for the glitter. OTD top coats dry in 45 seconds. This top coat is made with fine glitters that tend to fall to the bottom, so you need to shake up the bottle. It creates a gorgeous sparkle effect that looks rediculous in the sun. Since this IS a top coat, you can stop here. But...

6. Apply one coat of Essie No Chips Ahead Top Coat. I work in a bakery-cafe, and I always have my hands in water and am cleaning/peeling/scraping things. Therefore, I really need nail products that prevent chipping as best as possible. I' ve accepted the fact that I cannot wear a manicure for more than a week, and this is the best combination of products that I have come across so far. It lasts almost a week without chipping, with minor touch-ups on tips needed to maintain the look. I did this on thursday night, and it's still going strong. *Warning: This is NOT a fast-drying top coat.

For accent nail:

Instead of step 3, apply two coats of My Boyfriend Scales walls by OPI. I waited about 10 minutes for it to dry (I don't have patience), but I suggest waiting at least 10-30 minutes if you're going to stamp. This is because, even if the nail is dry, you can still bend/smudge/smoosh the polish when you go to stamp, and then you have to start all over again. I may or may not have put on a coat of Seche Vite just on the accent nail to help the drying process.

The polish i used to stamp with is just called Black by Kleancolor. I used these polishes to stamp because, in my experience, these aren't really good quality polishes (they chip within a day) and they're kind of thick (which is good for stamping)  

The plate I used is Mash 38. The only stamping plates I have are Mash and Bundle Monster. I got BM first and I thought I was an idiot because it took me like a half hour to get one stamp on my nail. After I got the Mash plates, it only took my one try. I feel that the Mash plates are better quality and the designs are etched a little deeper than BM. But that's just my experience.

Finally, I used a Konad brand stamper and scraper. A lot of people use an old credit card instead of a scraper, but mine works fine, so I just use that. Finish with steps 4-6.

I hope you enjoyed the first post! If you have any questions about products/pricing, or if you like what you see, please leave a comment!

xoxo,
Belle <3


*not our real names.