

Firstly, if you aren't familiar with NAS, they send you a curated nail art kit once a month for $9.95 plus shipping, so in the U.S. (New York specifically) it comes to $14.90.
This subscription service is pretty unique, and I haven't come across anything like it yet. Apparently they recently overhauled the site due to various issues, and this is the re-launch month. Even if you already had an account, once they re-did the site you had to create a new account.
So here is the September kit:

It came with four ORLY Instant Artist water-based paints in jet black, true blue, platinum, and crisp white.
Personally, I think these are awesome. The brushes are striper brushes, which makes it easy to do simple, freehand nail art designs. A while ago I bought a 40
or 50 piece set of nail art polishes from amazon, the brand is Emori, and well, they kind of suck. The colors are really nice, but if you try to use them for more than 5 minutes, the paint starts to get goopy and makes lines on your nails that you don't want. Also, you have to cut the brushes, because they all have one really long strand that makes it difficult to distribute the paint evenly.
What's cool about the ORLY ones is that the paint is water-based, so if you make a mistake, you can wipe it off without messing up the nail polish underneath (just make sure you wait for the nail polish to dry first!)
I also like that they give you basic colors that you could probably use with any mani. They are extremely easy to use, dry fairly quickly, and they look great.

The next set of items is Cala brand Professional Nail Arts Water Decals. The first one contains different coloured butterflies, and the second contains silver butterflies. Now, I like butterflies as much as the next girl, but I'm not in LOVE with them. I don't know why they would send TWO different sets of butterflies. I would have loved more variety on these. I associate butterflies with spring instead of fall, so that's another reason I'm not super stoked about these. However, the silver does contain a few non-butterfly decales (roses) which I used (pictured below).
I will say that they are extremely easy to use, and they look super pretty. All you do is make sure you have a top coat (I used Out the Door fast drying top coat), tap the back of the decales with water with your finger, slide the design off, place it on your nail, and seal with two coats of top coat (I used China Glaze No Chip Top Coat).
Other things that were included in the kit are a chevron manicure tutorial, a paper about the featured nail guru who curated this months kit, and an ORLY color guide.
Nail Art Society is also running a contest where you use your August kit, and upload your mani to twitter or Instagram. Then you tag @nailartsociety and @orlynails and then hashtag #NASGiveaway, #welcomebackNAS, and #nailart
(I just entered, wish me luck!)
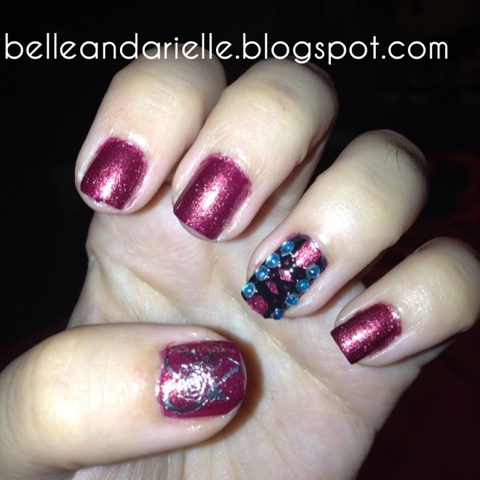
In conclusion, I am definitely intrigued and am excited to see what NAS comes up with next. Here is the mani in which I used the jet black ORLY instant artist and one of the non-butterfly silver water decals:


I used Play Dirty by Pistol Polish as the base color (review of Pistol Polish below)
xoxo,
Belle
p.s. if you are reading this, can you please drop a comment in the comment section? We're just curious to see who actually reads this and what kind of an audience we have. Thanks!!


