Showing posts with label rhinestones. Show all posts

Friday, October 18, 2013

Halloween Nail Art Part I Don't Even Remember

Hi guys! So I did some more Halloween nail art that I wanted to share:

I was definitely inspired by Arielle's ghost post.


I started with Glitter Daze's Super Smooth Basecoat. I have a tear on one of the nails on my opposite hand, and I used the tea bag method to fix it (apparently I didn't do a very good job because today it's pretty flimsy again.) Anyway, this particular basecoat is ridge-filling, and I wanted to be consistent, so I used it on all my nails. 

The base color is After Midnight by You Polish. This might actually be one of my favorite nail polishes right now. It's a black base with orange, purple and silver microglitter. At some angles it looks like there are green glitters as well. It looks so pretty in person. At first, I put it on my toenails (which i didn't take pictures of, because feet are kind of a weird thing...some people really hate them and some people REALLY like them). I kept looking at them and decided to use them as a base for Halloween nail art.

The skull and the bat are Cala nail decals that came in my most recent Nail Art Society kit. 

The spider is from one of my Mash image plates. If anyone actually wants to know what plate it is, I can find out, I've just temporarily misplaced my plates. 

Mash actually has a new set of plates out, which I got for my birthday (they came out like RIGHT before). I also bought the first set (i only had the middle one), so now I have all of them. I'm really excited because, not only are there some REALLY awesome images, but some of them are the same as the Bundle Monster plates, but unlike BM plates these ones will probably work. 

I'm also waiting for stamping polishes that I ordered from Born Pretty Store, but it's been like a month and they're not here yet. I emailed and was told to wait 10 more days. 

Anyway, I added a red rhinestone to the spider's back. Not gonna lie, I'm pretty sure this isn't an original idea and that I saw this on facebook somewhere. I think that white spiders are the scariest (like the ones that are on the outside of you car window but you don't realize it's on the outside and you start driving and almost crash into a tree...

Moving on...the ghost is something I did freehand with a nail art brush and white acrylic paint from Michael's. I was originally going to use a ghost nail plate image, but I couldn't get it to come out that good (it was an outline of a ghost rather than a whole one). I really didn't expect it to come out like this. I have no artistic ability whatsoever. But, ghosts don't really have a well-defined shape, so they're pretty easy to freehand. I put black rhinestones for eyes and drew a little mouth. I think it came out really cute :)

The accent nail, or rather non-accent nail, is two coats of Tatiana, my favorite Julep ever. 

Over everything I put China Glaze No-Chip Top Coat and then two coats of China Glaze Ghoulish Glow. I was expecting each nail to just have a general glow to it. What I was not expecting was this:


The ghost glows like INSANELY by itself. I have no idea why that happened, but it's FREAKING AWESOME. I considered stamping with glow in the dark top coat to make glow in the dark ghosts, but I wasn't sure it was going to work. This is seriously WAY cool....and I was not expecting it. 

Today at work, my nails chipped like crazy. Friday mornings at my job are really busy, so maybe it was because I was doing everything fast. I touched everything up and decided that my "accent" nail was too boring. I decided to try out Don't Bite The Heart That Feeds You by Glitter Daze (it's so pretty and halloween-y I couldn't resist). 


More nail art is definitely coming soon, I have a wedding and two Halloween parties coming up!

Thank you to all of our readers and subscribers, and if you like what you see please press the follow button <3


xoxo
Belle


Friday, October 4, 2013

Subscription Review: Nail Art Society September 2013


Hi guys! So today I have for you a review of my second monthly Nail Art Society box, this time for the month of September.

If you didn't already know, Nail Art Society has a subscription service where you get a curated kit of nail art supplies delivered to your door every month. When I joined, the price was like $9.95 plus shipping, so it ends up coming out to like $14.90. I think they raised the price slightly within the last month, so now it's $11.95 plus shipping, but if you're grandfathered in, you still pay the original price.

I knew my box was supposed to come today, but I didn't recognize if right away. Last time it was in a dark purple bubble bag (like Ipsy). However, this one came in a normal, nondescript brown box. I opened the box and found this: 
A mysterious (although reusable) black bag! All these goodies were inside of it: 


Featured product: Gold and Silver Flake:
I've never worked with any kind of flakes before. They seem really interesting, and when I opened the little bottles I noticed they are REALLY delicate! NAS has been posting pictures of manicures featuring the goldflake, so I actually have some ideas of what I can do with it. This is cool  because   I don't own anything like these
in my collection! I'm excited to try them out. 


Nail polish! Yay! This is from the brand Jessica Cosmetics. The color is called Cinnamon Kiss. This color IS fall. It's a gorgeous "blackened" red with metallic shimmer. It's just sexy. 


More Cala Nail Decals! I was happy with the ones I got in the previous box (not so much with the butterfly theme, but with the fact that they are very easy to use and look beautiful). This one includes crowns, lions, crosses, very England royalty. I love crowns so I was excited to see these.


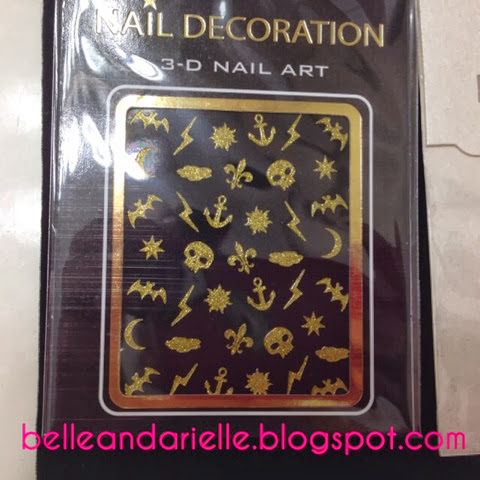
More decals! And they're Halloween themed! There are skulls, moons, lightning bolts, bats, and anchors (which I love, even though they have nothing to do with Halloween). There is so much more variety this time than in the last kit, and I wonder if NAS took customer feedback into consideration while putting this kit together. 


Adoro brand clear teardrop rhinestones: Never heard of this brand before. There are 6 of these rhinestones, they're very sparkly and probably look awesome in the sun. They're kind of big for natural nails, but they look pretty interesting. 


Adoro Elements circle rhinestones: almost all of these are gold, except two that are a really pretty iridescent color that looks different from every angle. They match the whole golden royal theme of the box. 


Finally, two information cards, one about the Jessica Cosmetics nail polish and their Night at the Opera Collection, and one about the featured nail art guru who curated this month's kit, as well as pictures of manicures using the items. 

All in all I think this month's kit is a big success. I really like the Halloween/royalty theme, and the silver and gold flake seem pretty interesting. I'm also glad the kit included nail polish. I have A LOT of nail art items, so it's nice to have things that I didn't previously. Can't wait to see what NAS comes up with next! 

You have until the 15th to sign up to get your October kit, so get yours at http://www.nailartsociety.com

xoxo,
Belle


Birthday Nail Art!

Hi guys!

So, my birthday is on Sunday, and I may or may not have been planning my birthday manicure for the past few weeks, and I finally got to do it today :)


I used Glitter Daze Super Smooth Basecoat first, and then two thin coats of Raegan by Julep. 

The thumb and pointer finger are skull/crown decals that I ordered from amazon. They're meant to be used on dry nails, so I waited about 10 minutes just to be safe. Then I put a coat of Sally Hansen's Anti-Chip Top Coat (red bottle) on too. 

The pinky is an acrylic skull I also ordered from amazon, it came in a pack of like 10. To be safe, I put on a coat of brush-on nail glue under it, and then again over it (pro-tip: once the nail glue is on top DO NOT touch it, because then it will stick to your finger and come off your nail). 

Middle finger is just a cross made of rhinestones (for some reason I've been really into them lately. I put a layer of nail glue under and then a layer of Tough Coat on top. 

The thumb is a image from a stamping plate that I ordered on amazon. I'm not exactly sure what the brand is, but the plate is QA8. I know they sell this plate at bornprettystore as well. 

Then I topped everything with Northern Lights Top Coat by Out the Door to give it a overall sparkly look. 

I just have to get through 6 hours of work tomorrow without chipping/acrylic skulls coming off, and then the birthday celebrations can begin! 

xoxo
Belle


Monday, September 30, 2013

Random Nail Art


Hello,

So I saw my mom today and she let me give her a manicure. I wanted to share it really quick:


The main color is Madison by Julep, and the accent color is Oscar by Julep. These are the two colors that come in the intro Bombshell box, and they look stunning together. 

The pointer finger is just a cross made out of rhinestones, and the middle finger is one of the butterfly decals from my September Nail Art Society box. The pinky is a fimo bow. I put Northern Lights Top Coat by Out the Door to give it a little extra sparkle. 

Will probably be posting lots of Halloween related nail art in the near future. 

Peace,
Belle

Saturday, September 7, 2013

Nautical Nonsense

Hi! Just wanted to post a quick summer-is-basically-over mani: 


The base color is Julep's Dianna, that I got in the Big Picnic Mystery Box. It's a really pretty mint green, and it goes on so nicely. I love Julep polish because they're some of the only ones I've tried that don't leave bubbles on my nails. 

The thumb is a freehand attempt to draw a...boat steering wheel? (It probably has a different name). I used a nail striping brush. I did it in gold first, but it came out terribly, so I did silver over it. The effect wound up looking pretty cool by accident. Also used a striper for the pointer finger. I've seen stripe designs like this on Pintrest, and I love how it came out. 

Middle finger is from one of the Mash image plates #32. I used China Glaze Elephant Walk to stamp with. The circle around the compass is supposed to be really thin, but it kept not coming out, so I  just went over it with a striper brush. 

For the ring finger I looked up pictures of anchors and copied it. Before each rhinestone I put a coat of Tough Coat (clear nail art polish), and I used Mash nail art tweezers. 

The pinky is white nail tape. 

This is probably the second favourite manicure I've done (next to the Egyptian one). 

In other news, be prepared for a bunch of subscription reviews and multi-chrome polish swatches (I bought like 10 multichrome polishes and subscribed to a few more nail polish boxes [my bank account is crying]). That's all for now!

xoxo,
Belle


Tuesday, August 27, 2013

Walk like an Egyptian

Hi guys!

So this is probably my absolute FAVORITE manicure that I've ever done: 


Here's how I did it:

1. Base coat... I used Sally Hansen Powerful Acrylic gel, but you can use pretty much any base coat. 

2. 3 coats of Cowardly Lyin' by China Glaze. For some reason, it just wouldn't get to the level of opacity I wanted. I used thin coats though. 

3. Wait 10-30 minutes before stamping. For real. Or you'll regret it. 

Thumb: Mash image plate #35. 

Pointer finger: If you can't tell, I free-handed this with a nail art brush and acrylic paint. I SUCK at free hand painting (unlike Arielle, who is a naturally gifted artist) so it's not that great. You can get acrylic paint at any arts and crafts store or on amazon...they usually come in bundles of different colors and people use them a lot for nail art. They're also cheaper than nail polish. 

Middle finger: Mash image plate #36. I could not believe that they had an Eye of Horus image...which was probably what inspired the entire mani. I put a dark blue rhinestone right where the pupil of the eye would be. 

Ring finger: Bundle Monster plate #04. I had a REALLY difficult time with this image. All of my MASH images came out in one shot...this one took quite a while and I had to touch it up with a nail art brush. I used light blue nail tape on the top and the bottom of the cat. You can get like 30 rolls of nail tape in different colors for very cheap on amazon. 

 Pinky: Mash image plate #50

Finished it off with Seche Vite top coat. If you can't already tell, I like to do manicures where each nail is different, and I like to combine stamping, rhinestones, nail tape, and basically anything else I have lying around. Anyway, that's all for now, happy polishing!

xoxo,
Belle